BlackIce Printer Setup
1.Open File Explorer and use path " \\fs-ebe02\CaptureIndexAutoUpdate\Installation\BlackIce_PC_64 " to access the appropriate folder.
2.Double click on the "Setup" Application
3.Click "install"
- Note: If .NET Framework 3.5 has been installed, it will install it before Black Ice Print Drivers install
4.After the driver has been installed, you should see "Done" (green arrow) above the progress bar. Then press "Cancel" (red arrow) to exit the installer
5.Open "Printers & scannners" in system settings
- Note: There should be 5 printers: "Black Ice TIFF Driver, SHIPS, SHIPS Personal Indexer to TIFF Driver, SHIPS Rate Con to TIFF Driver, & SHIPS TMW Invoice to TIFF Driver. Black Ice TIFF Driver & SHIPS will not be used
6. Click on the printer highlighted green "SHIPS Personal Indexer" and click "manage"
7. Open "printing preferences"
8. Under Device Settings change Paper from "Fax Paper" to "Letter, 8 1/2 x x 11" (red arrow). Uncheck "Create faxable image" (green arrow). Change Resolution from "Fine FAX Resolution" to "Medium Resolution" (blue arrow)
9. Under "File Formats" change TIFF Group 3 to TIFF Group$4 (green arrow). Check the boxes for "Save each page as separate file, Extract text to file, & Save position and style" (red arrows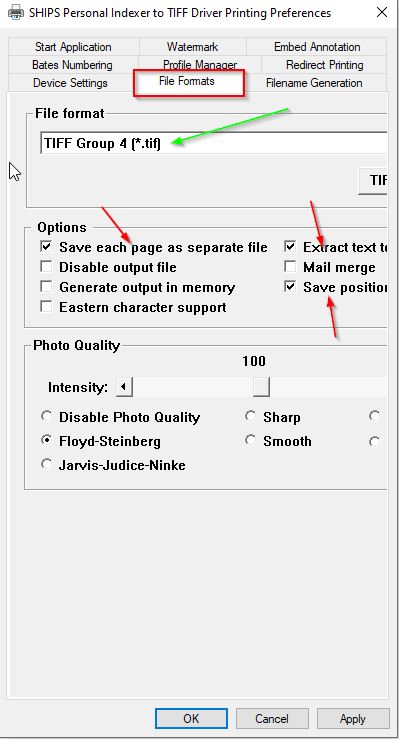 )
)
10. Under "Filename Generation" change the Output Directory from "C:\Temp\" to " C:\Person Indexer " and then hit apply. An error will pop up stating "Directory not found. Do you want to create it?" Click "Yes".
11. For Printers SHIPS Rate Con to TIFF Driver & SHIPS TMW Invoice repeat Steps 6-9. Then Under "Filename Generation" change the Output Directory from "C:\Temp\" to " \\10.1.0.43\Print_input ". Check the box for "Delete Group File After Printing", then click apply.
*take a smoke break
Related Articles
Zebra Printer - TMT setup
1. Ensure your Zebra Printer is connected to your PC 2. Check for errors under "Printers &scanners" in your system settings + Use this manual to setup/troubleshoot: https://www.uline.com/PDF/IH-3991VND.PDF 3.Open Transman (Work Resources) 4.Click on ...How to change from SOTI MDM to Samsung Knox Manage
Before you can setup a device in Knox Manage, you must first factory reset the device. In order to that you must remove the SOTI MDM software/license Remove SOTI License 1. Send an email to service-request@e2cc.com and request removal of the SOTI ...Create Settlement Schedules / Pay Periods
In settlements >> Setup >> Settlement Schedule >> once the screen opens either hit new or find KBT ADDITIONAL PAY to add additional dates to it>> at the bottom click new and fill in the dates To add a line to an already existing pay schedule below ...Setting up a new user in Okta/TecMFA
1. Go to drivefs.okta.com and sign in 2. Click on Admin in the top right corner 3. On the left hand side menu, click on Directory Integrations under Directory. 4. You should see a list of active directories. Click on the FS.Rushville.local directory. ...Tech MFA install
1. Open File Explorer and enter the following address in the address bar: \\fs-data01\Client Apps\TechMFA\Production 2. Run the latest version of the TecMFA Windows Installer Package 3. Click "Run" on the security warning popup 4. Click "Next" on the ...